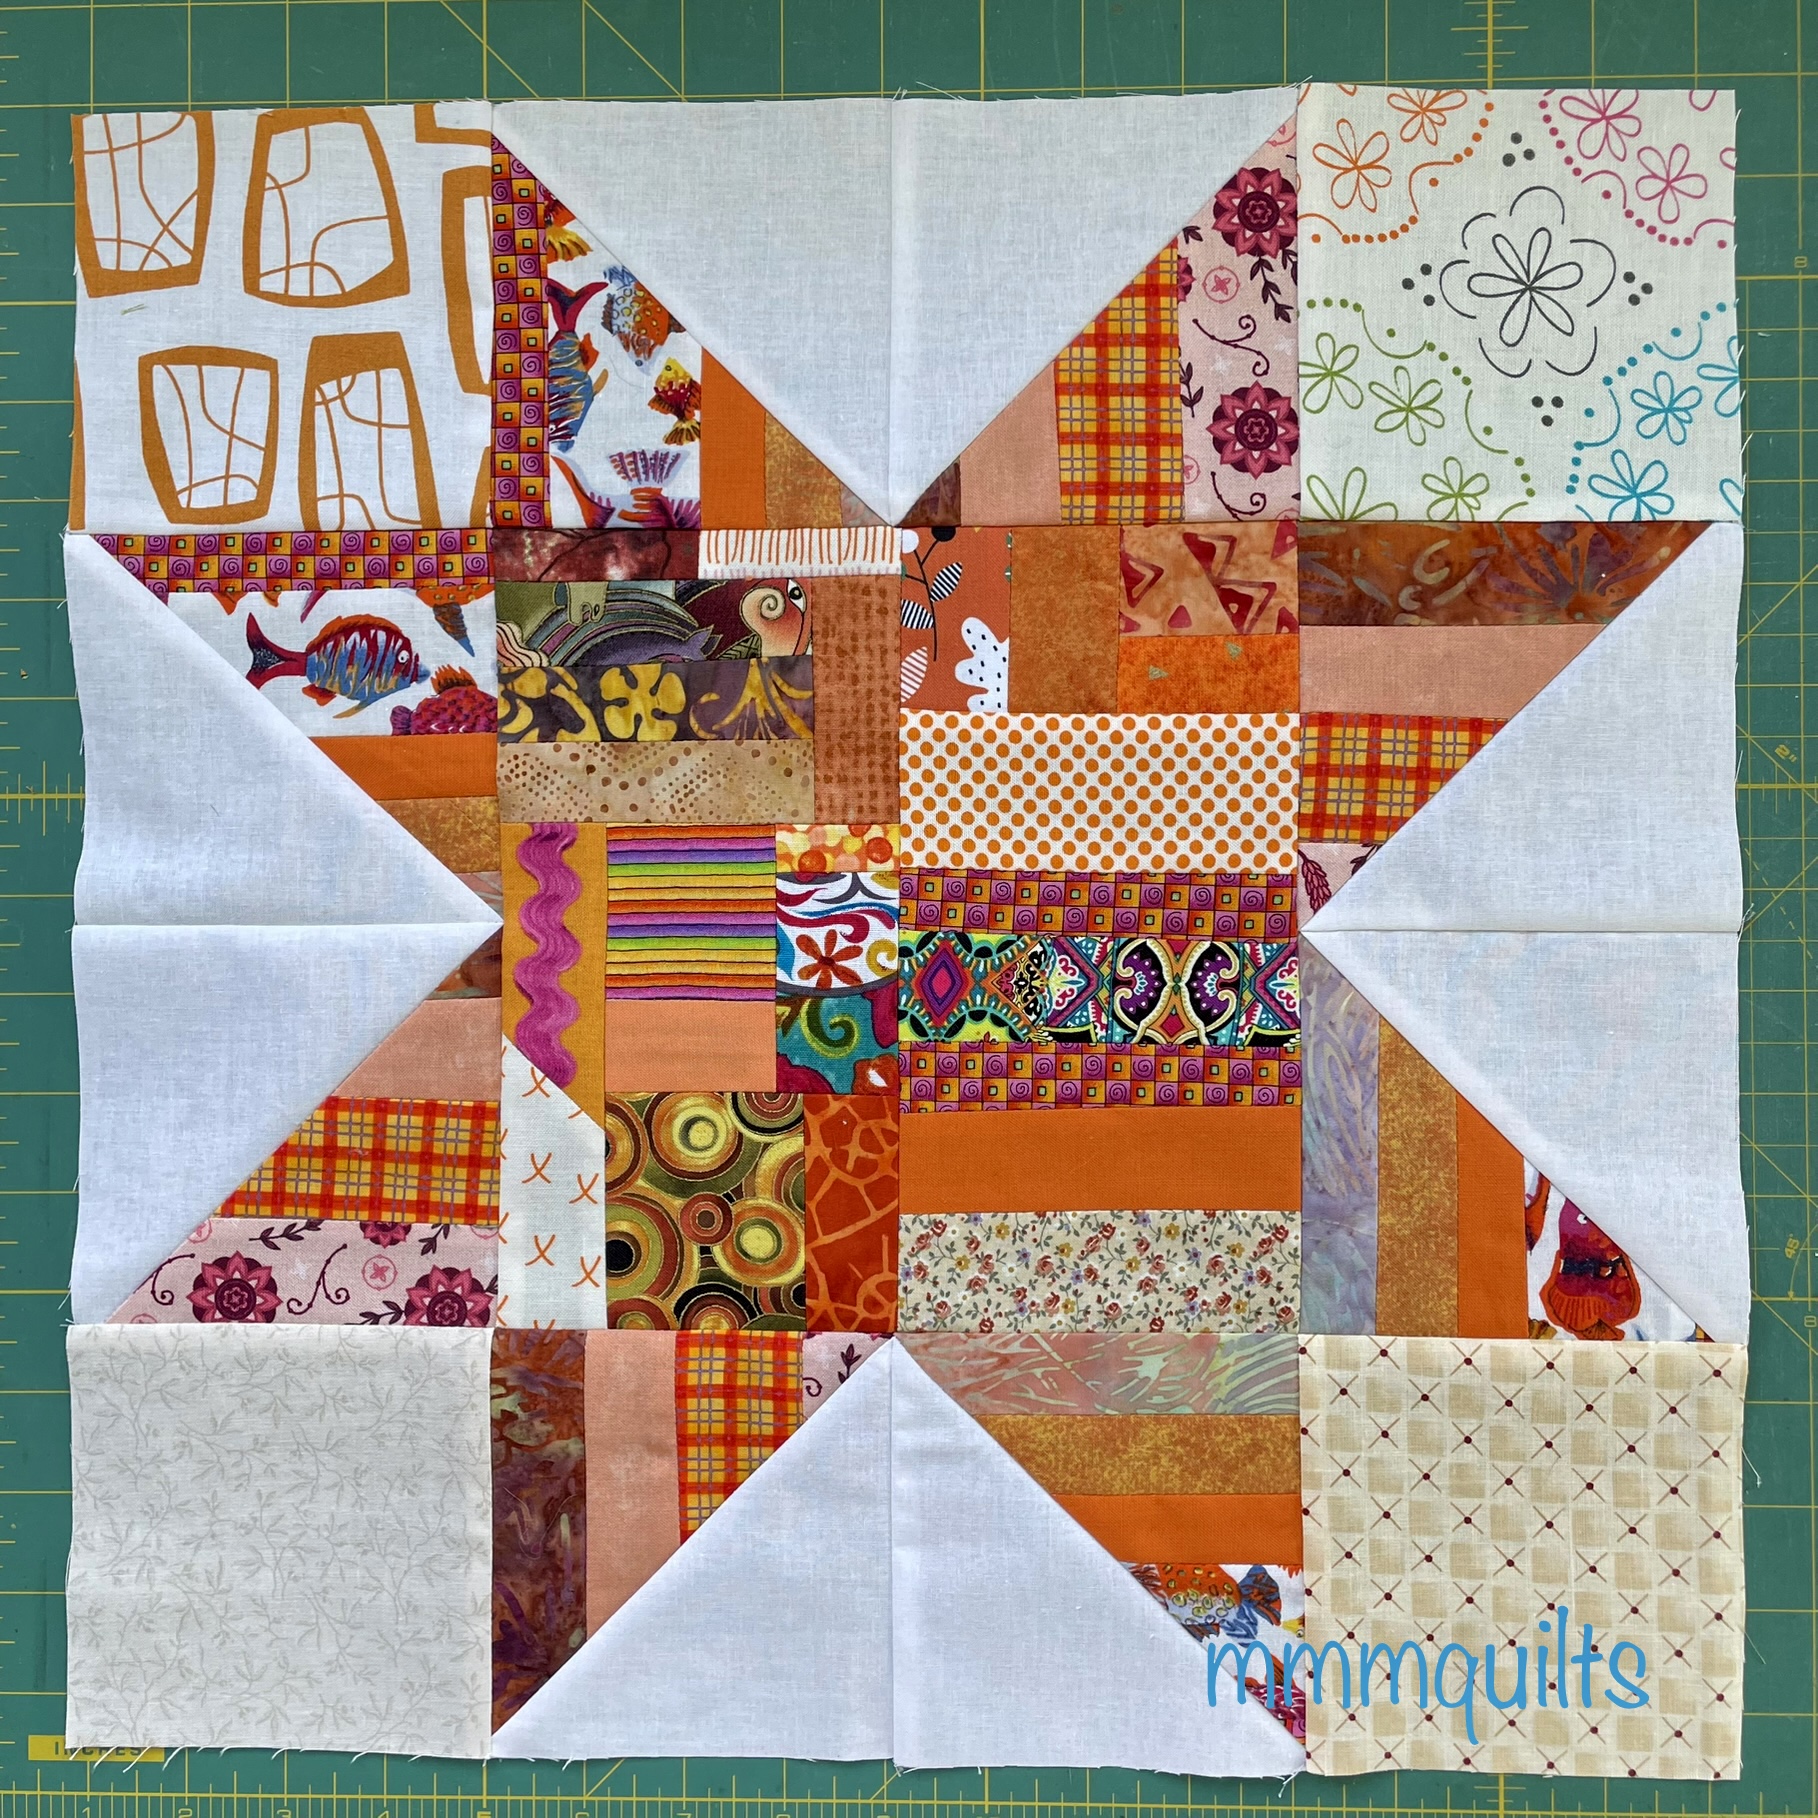
As you know, I’ve inadvertently started a third RSC project this year. This is a great block to use up strips and scraps. In an effort to use up my crumbs and make a dent in my strips (don’t ask how the strips dent is going), I hit upon this lovely large 16” finished Evening Star block. Here is my orange one complete.

How do I make these? Let me show you!
Crumbs, as in small pieces of orange fabric scraps
Strips that are about 11” long and vary from 1.5” to 2.5” wide
(1) 10” square of background fabric
(4) 4.5” squares background fabric
The first thing I do is dump out the little sandwich-size baggie of crumbs that I keep inside my scraps sorting box. 
So far, other than green, I have successfully emptied each month’s baggie. For orange, I had to dig into the scraps box and the strips box to find enough bits to cobble together to make the star centre block.

1. To make the centre square for the star, make an approximate 9” square of fabric with your crumbs. Trim it to 8.5” square. Set aside.

2. To make the star points, first sew together enough orange strips to make a square approximately 11”. Trim it to 10” square.

I have found that pressing seams open results in a flatter end product for these slab stars.

3. The star points are made using the eight-at-a-time HST method. Layer the 10” strips square you just made with the 10” square of white fabric, right sides together. Mark two diagonal lines from corner to corner to form an ‘x’.
 |
| I like to use my Hera marker for this. |


Eight HSTs!

5. Press four HST seams to the background and press four to the strips.

6. Square your eight HSTs to 4.5”. Sometimes a very narrow strip will end up at, or very close to, the 1/4” seam allowance as you see above on the left. In this case, I carefully rip out the seam that joins this super-narrow strip to the wider one (coral)…
 |
| Even trimmed there is still that super skinny piece, so carefully remove it as indicated above. |

7. Lay out the eight HSTs with the four 4.5” background squares and the centre 8.5” crumb star centre, ensuring that you have the two adjacent star points with opposing seams. This means the star point on the top left has seams pressed to the background, whereas the star point on the top right has seams pressed to the orange strips. Thus, the seams will nest. You can see just how nicely they nest if you look at the star points in the middle row that have already been sewn together. Yes, I'd already started sewing the rows together. I almost forgot to get a photo of the layout as I was so excited to see it come together.
Sew into three rows. Press the seams to the background squares in rows one and three, press the star points seam to one side or open, and press the middle row star points unit toward the centre crumb square.

8. Join the rows together. The block should measure 16.5”.
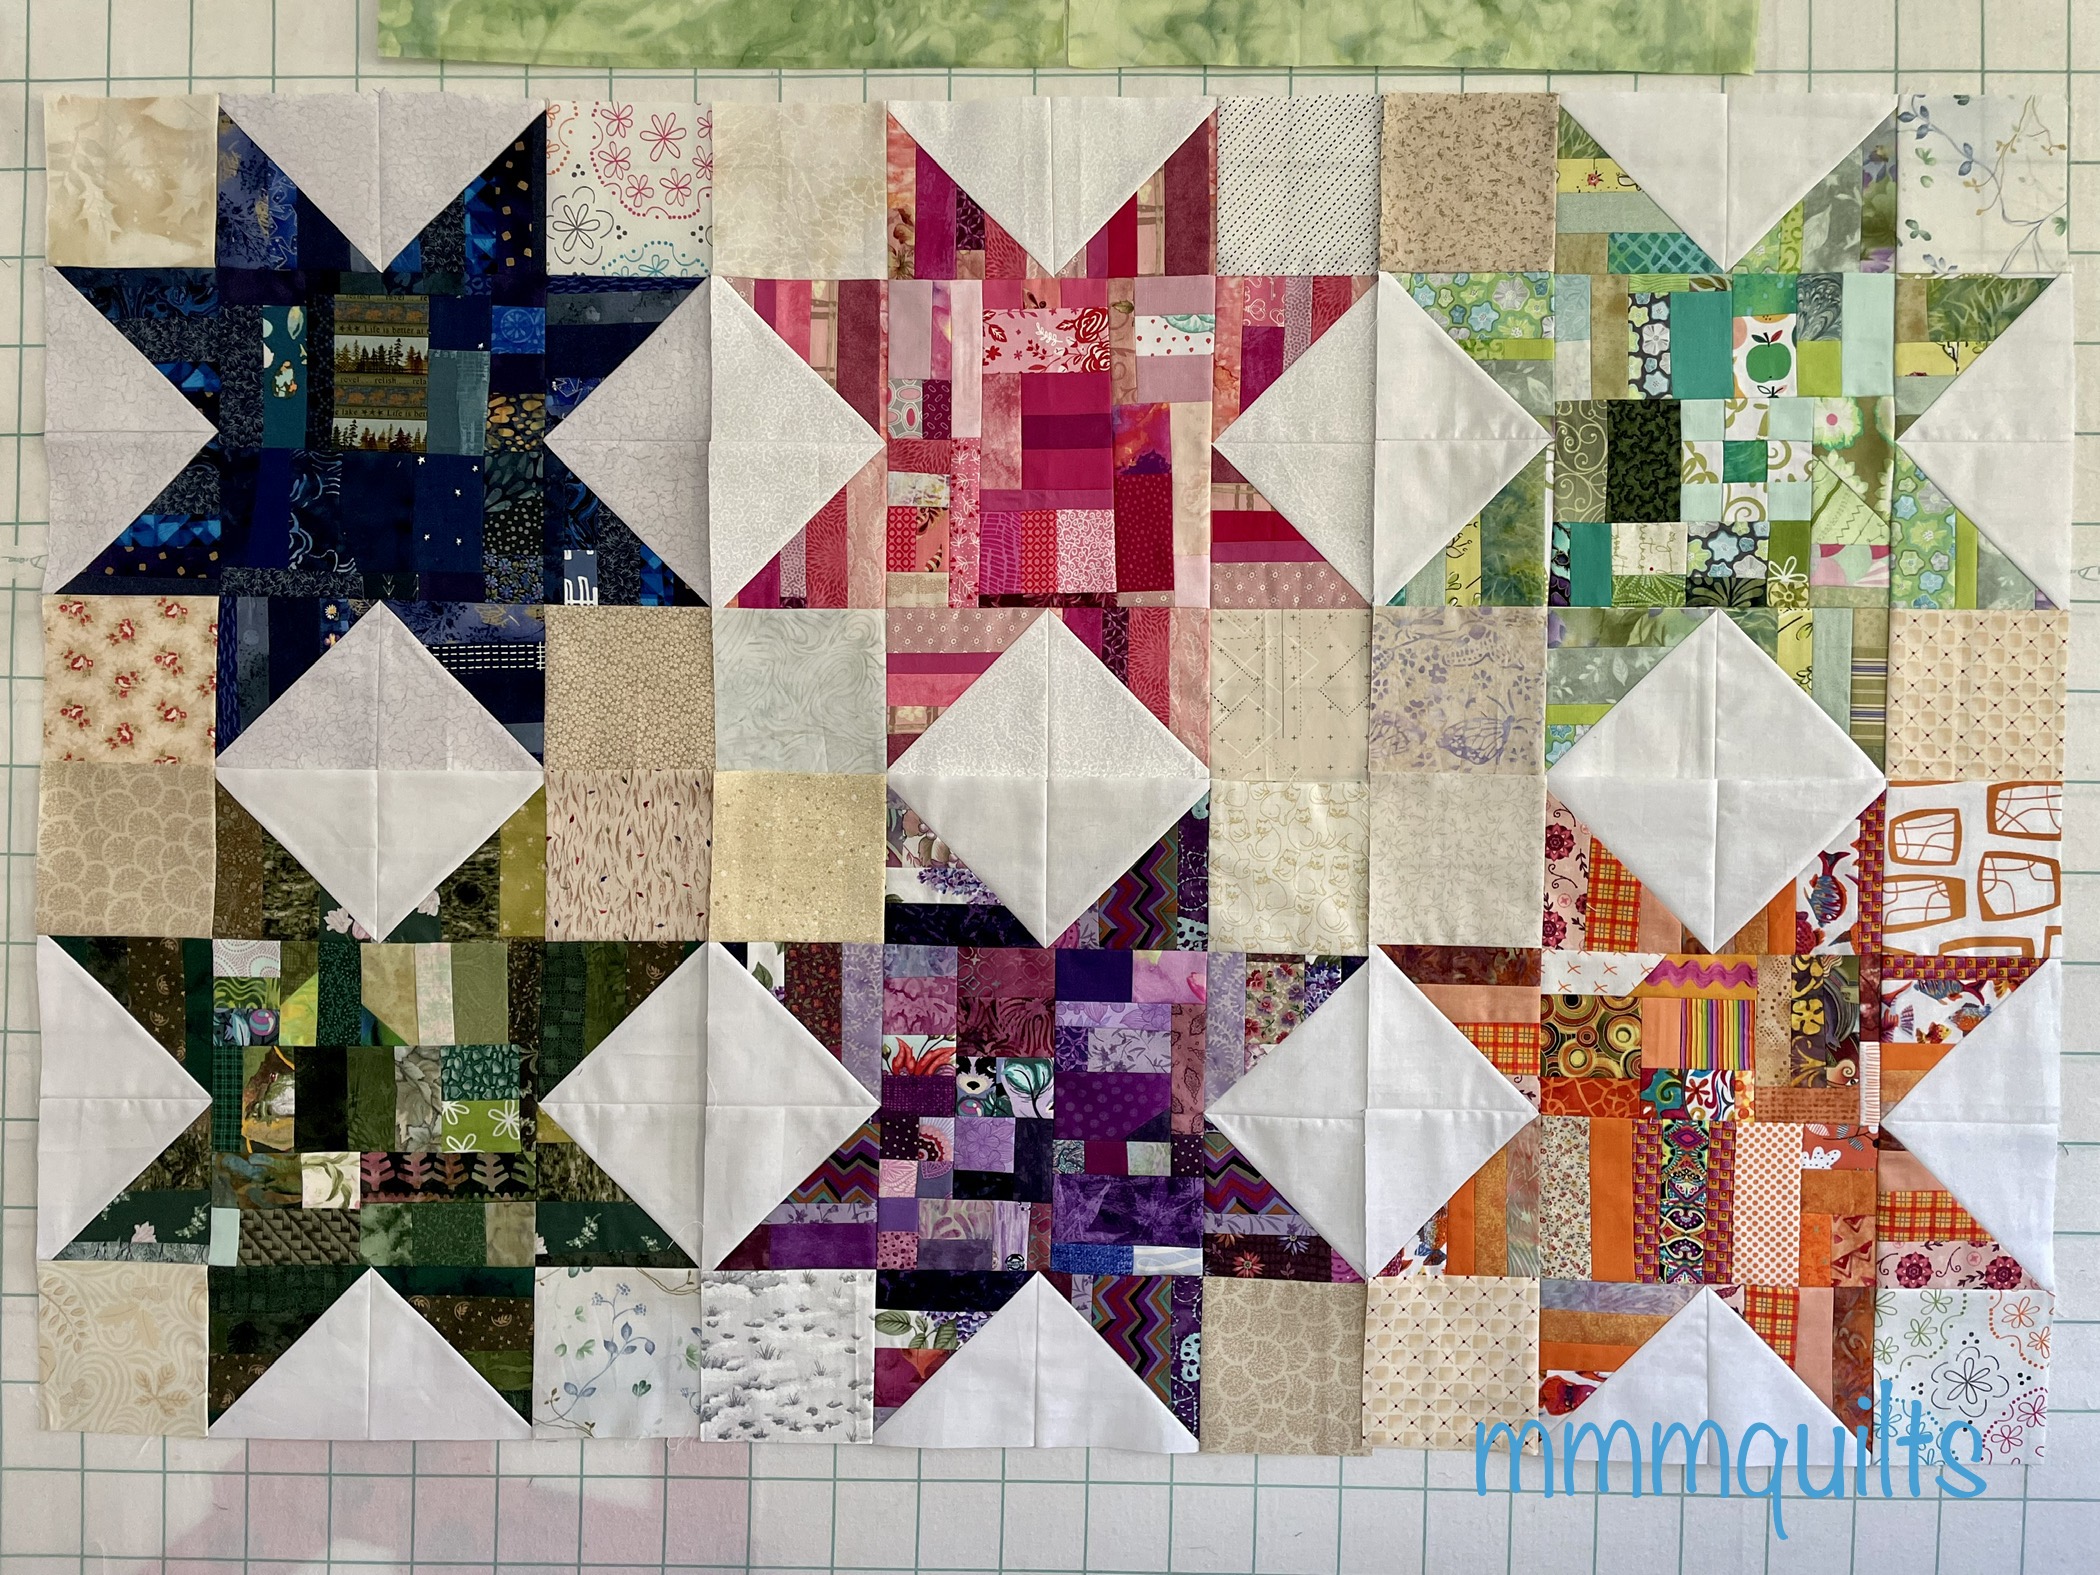
9. Here are my six stars so far. Nine of these will make a 48” square quilt! I’ve chosen to use cream and beige low volume 4.5” squares to add a little interest to the 4-patches that form when the blocks are joined. An unplanned surprise is that this makes the white background HSTs that form a square on point, stand out!
Once I have my last three blocks sewn, I'll update this post with the quilt layout. And here it is:

Go here to see the finished quilt.
Happy sewing! Do let me know if you make this block or quilt.
Another issue of Make Modern (affiliate link as are those below) has just been published, thanks to Susan for pointing out that it’s being published May 12!! Not May 5 today🙈

and, as usual it is full (10 patterns full) of quilt inspiration and great articles to read.

Make Modern is sponsoring my Rainbow Neighbourhood QAL with a 6-month subscription going to one lucky winner. It really is a worthwhile purchase, and, just recently, they have indexed their patterns so that you can search the Quilt Pattern Database and easily find the issue that has the pattern you want. How cool is that? There are over 550 patterns in the index, and you can filter them by baby quilts or bags, etc.

For example, here is a screenshot of the page where my quilt, Heading North, in issue 39, can be found. This way you can purchase just that issue as opposed to getting a subscription.
I also sell the pattern in my Etsy store, just so you know!

There's also a new Article Index Database, where you can search by subject matter. Maybe you want to find out some more on the freezer paper paper-piecing method, or read about a certain designer. Brilliant!
One more affiliate announcement: Connecting Threads has their thread on sale!

Right now there is 25% off thread sets and 20% off spools and cones. I absolutely love this thread for quilting. It has a beautiful sheen as you see, and is strong, and produces no more fuzz than other cotton threads like Aurifil and Gütermann, both of which I love and use all the time too. At just $3.40US a spool right now it is a terrific buy. The spools are 1200 yards, aka 1100 metres.
I particularly like Tea-Dyed and Custard for quilting a quilt with many different colours. These two, Custard especially, really blend in well.
Happy shopping! As you know, I get a commission on these products, which helps to pay for things like posting prizes in Quilt Alongs!💕
Linking up
The use of low volumes in the corners and cream with the star points makes a beautiful secondary design, as you point out. Fantastic way to use up those crumbs!
ReplyDeleteWhat a nice block! It's really good for using-up the littlest bits, and makes a pretty design. I am happy to see you and I have some of the same scrap prints, noting that in your first picture there's a piece of Amanda Jean Nyberg's "Good Neighbors" collection - the white background piece with the orange Xs. I loved that line. Have fun making your blocks. They're looking great in different colors.
ReplyDeleteI love it & can't wait to see a finished quilt in the future. Using only scraps for my Village & that's fun. MM is due next Friday isn't it? Not had my email as yet. Take care & hugs.
ReplyDeleteIt's been a long time since I've made a crumb block (I made MANY when I first discovered them!) and I could be tempted to make some more, with this inspiring tutorial - thank you, your blocks look great!
ReplyDeleteA good use of crumbs and strips I look forward to seeing the end result.
ReplyDeleteA great way to use up those little pieces!
ReplyDeleteThank you for the tutorial. I have several copper Christmas fabrics and this looks like a great pattern with which to get a not-in-your-face small Christmas quilt for either the wall or table.
ReplyDeleteI do love blocks made with scrappy bits of leftovers. I think they are more interesting than the traditional one fabric block. Looking forward to seeing your quilt come together.
ReplyDeleteWhat a great block from crumb bits! Thanks for the tutorial, I'm bookmarking it to try soon.
ReplyDeleteLove the way you work with all those tiny pieces to make something so beautiful! Thanks for the measurements. I like that the star blocks are large like that and it will take fewer blocks to finish a decent sized baby quilt.
ReplyDeleteLook at you go!! your crumbs should be cleaned up in no time!! Great blocks!!!
ReplyDeleteThose crumbs are being put to great use. Love the low volume in the corners too. It is a fun block and a great way to get some of the scraps whittled down!
ReplyDeleteHi Sandra! This is pretty darn slick. Your directions are spot on, and I thank you for sharing them. I hope you are doing well and enjoyed a Happy Mother's Day. {{Hugs}} ~smile~ Roseanne
ReplyDelete