Showing posts with label paper-piecing. Show all posts

Friday, April 17, 2026

Lyra Quilt Along - Piecing the Kite-Shaped Star Points

One of my favourite things about hosting these Quilt Alongs is seeing everyone’s fabrics, so when I saw the fabrics Susan in Australia (Granny Smith Quilting) has pulled, I thought, for the second time, and am now acting upon it, that we need a link-up to show off our fabric choices and/or cutting. If you don’t have Instagram or a blog, just email me (click ‘View my complete profile in the sidebar) a photo, and I will happily post them for you!


I thought we’d tackle the more intimidating shape first. I’m sure you’ve found that cutting the kite shapes is a bit of a pain in that they don’t nicely line up along the fabric length. I did update the cutting post with a photo of that step. This results in some weird leftover triangles which is annoying, I know. It’s worth it though for the cool effects they add to your block.

Monday, March 21, 2022

Project Quilting 13.6 and Wrap Up

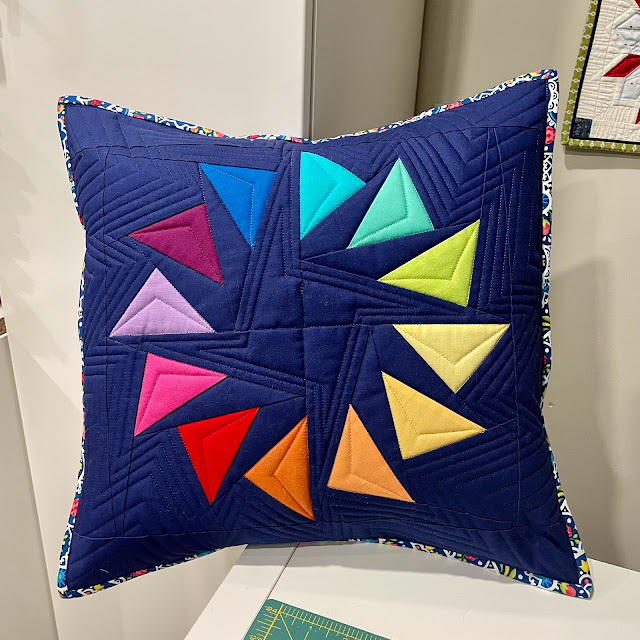
I finished Project Quilting, at Persimon Dreams, made every one of the six projects, and got them linked up on time. I'm pretty pleased with myself. Here is Challenge 13.6 Flying Geese.

I have had the Kona Nightfall for a while with the idea of a quilt background, rainbow colours on it, and haven't done anything about that thought. Until this challenge.

Thursday, March 11, 2021

Heading North in Make Modern Issue 39 and TGIFF

The hardest part of having designs published in magazines is the waiting. The quilt has to be done months ahead of the issue's publication date, and it is so hard not to show the quilt when you've finished it. However, the day is now here, and, because the editors couldn't decide which quilt should be on the cover, they asked for readers' help, and so you've seen a little glimpse of it. Well, allow me to give you a much larger look!

Apparently it was down to the final day for voting when the winning cover quilt (and I quote), 'just squeezed by yours'. Sigh. Ah well, the one that squeezed by is beautiful, and 'in the wild' too! Knowing that my quilt came so close makes me happy, and having heard from so many of you that you'd voted for it warms my heart. I worked my heart out on the quilting of this baby.


And, a warm welcome to TGIFF, where we celebrate fully finally finished quilts! This isn't for UFOs or in-process quilts; it's a finish party, so let's par-tay and I'll show you mine if you show me yours. 😉

Wednesday, March 14, 2018

Modern Plus Sign Quilts - Cat-Eye-doscope

Welcome to my stop on Day 3 of the Modern Plus Sign Quilts Book Blog Hop. This is a terrific book, great ideas for new twists on Plus Sign quilts, lovely photography, and excellent instructions.
When I first heard that Cheryl had a book coming out with Paige, I right away emailed Cheryl, asking  if she was considering doing a book release hop, could I be a part of it. I've been a fan of Cheryl's designs for some time. She won my very first giveaway on my blog a few years ago. 😊 Of course she said, "Of course!" I wasn't the only one who wanted to be a part of the hop; there are 40 of us; that's love for you!

Tuesday, February 28, 2017

Paper-Piecing Without Sewing Through Paper

Like how? Huh? I know. I first learned of this technique from Joanne at Canuck Quilter Designs.  It has made me quite like paper-piecing ever since!  **Note! This tutorial will be needed for my upcoming Freefall QAL which begins on the Spring Equinox.  When is that? Monday, March 20 at 6:28 am EST.  If you want to try this method with minimal fabric to make the leaf point or just to make some cool triangles in a square blocks, here is what you do to get a 3" finished block as shown.

The worst parts of pp, for me have always been cutting the pieces of fabric big enough to cover the section I'm working on, (read waste), and then not so much though, the tearing off of the paper, because that is kind of satisfying in a way, much like popping the bubbles on bubblewrap! However, picking out all the little bits trapped in the stitches? Not a fan.😣
This method gets rids of both of those issues, and allows you to reuse multiple times the paper template.  You can use freezer paper if you like, as Joanne does, because a touch of the iron will adhere it to your fabric.  Alternately, you can use graph paper as I did, and use a dab of a gluestick to hold the first piece of fabric to the back of the graph paper.  I've done both; the only difference is that with graph paper/gluestick, there is a wee bit of gluestick residue on your fabric, but less is more remember, and a spritz of water will remove anything if you ensure you use washable glue.

Thursday, January 5, 2017

Jingle

So did you know that Henry Glass + Kate Spain = baby! Of the ornament kind that is. 😉

Guess I'm still not quite done with Christmas.  This is due in part to procrastination as well as to the win from Henry Glass Fabrics right before Christmas.  You can see the fabrics here.  Funny, one of the little Kleenex pack covers I made and showed in that post is going to the same person as this ornament is!

This is a paper-pieced little pattern from Lori's Country Cottage I got, oh about a century ago. Ha! Maybe about 1/5 of a century ago? Yee-ikes!  How it ended up in with my stuff to take to Florida i have NO clue, but it did, and it grew up from paper to finished quilted ornament. Magic!
Here is the flimsy. At 3.5" square with 3 sections, it gave me a full-quilt-size of trouble.  Trying to line up the angles of the green and the side seams...let's just say I did a whole lotta rippin'.  I settled for this in the end.  Along with Kate Spain's 'Jingle' fabric scraps, I used a scrap of lime from Paintbrush Studio's 2015 new block bloghop fabric. My block is in the very first Quilter's Planner, Nov. 21 week. The stocking cuff is a scrap from a little pillow, Bundle Up!, I made with fabric from a quilt shop I visited while at the Sisters Quilt Show in Oregon!

I quilted it with Sulky Holoshimmer in gold. Wonderful thread for wonderful fabrics.  The back is another print in the Shelly Comiskey "Kringle Krossing" line.
Couldn't get much more perfect a backing!
Here is a closeup, trying to catch the elusive shimmer and sparkle.
Quilt Stats:
Pattern:  Paper pieced single block freebie from Lori's Country Cottage
Size: 3.5" square
Fabric:  scraps and leftovers, except for the stockings Henry Glass Fabrics "Kringle Krossing"
Batting: Pellon Nature's Touch 100% cotton scrap
Quilted: on my Bernina
Threads:  pieced with Gütermann; quilted with Essential from Connecting Threads and Sulky Holoshimmer in gold 145-6003

I finished my homework for the 150 Canadian Women from Next Step Quilt Designs
From top left, #22 Kate Rice, pioneering prospector, miner and a most notable woman geologist, this gal was not afraid to be alone in the wilderness for extended periods of time, think entire northern Canadian winter?? She ended up living on an island named after her, out in a lake, which is why I used a red with bits of blue in it; #23 Marie-Anne (née Gaboury) Lagemodière - so cool because the Faculté St-Jean, U of Alberta, where I did a major chunk of my schooling is on the Rue Marie-Anne Gaboury in Edmonton. She was the mother of the first legitimate white child, a daughter, born in the Canadian West, she was also the grandmother of Louis Riel; #24 Elsie Knott, another 'kickass' Canadian woman, she drove a school bus along with several other menial jobs including sewing quilts, to support her family. At age 30, she became Chief Elsie Knott of the Ojibway, a respected leader.
I chose that coral pink for Chief Elsie Knott because upon spying it, I thought of Indian beads and dreamcatchers.  For Marie-Anne, grandmother of the famous and infamous Louis Riel, I had to use the maple leaves fabric scraps in the Windfall line.  Can you tell I am enjoying this quilt along?!

One last very exciting announcement!!! Drum ROLLLL!  I have a sponsor for

http://www.mmmquilts.com/2017/01/30-quilt-designs-challenge-2017.html
(and I made a button!) Next I have to remember how to turn it into one for my sidebar...

Presenting...
https://www.etsy.com/ca/shop/TheRedHenShop
Melody has had The Red Hen Shop on Etsy since 2013.  She stocks a wide variety of fabric, which includes some older ones you might not find anywhere else.  Click the link or the image to check out her shop!  We are doing four bi-weekly draws for prizes, and besides Lisa and my offerings, there will be a $15 gift certificate for a lucky winner.  And then there is the grand prize for all who complete 30 designs by March 15, a $50 gift certificate!

Although I won't be posting every one of my 30 designs here on the blog, here is #2.  Had a little issues with colouring order...made good use of my eraser!  All good.
Push 'n Pull or Aurora
I've been fascinated with 60° triangles, since my first Stack 'n Whack quilts.  When I first played with this idea, I saw it as either scrappy strings or improv slabs cut into 60° triangles.  When I played with shading, I thought I could try to bring out the hexagons formed by 6 triangles... I included a third colourway of blues, and then realized I needed to separate them so coloured in the solid greys.  Still not sure it works; maybe need the white strip across the bottom side of each triangle?  When I saw the thumbnail of that photo, I was struck by a similarity to the Aurora Borealis, or Northern Lights, something I dearly miss from when we lived just outside of Edmonton, Alberta. I do feel very privileged to have seen them so many many times, dancing across the northerly heavens with their spiderwebs of greenish/goldish/blueish effervescence.

Now I'm taking my effervescent little person off to plan for a couple more exciting announcements coming up very shortly on the blog!
Linking up with
Sew Fresh Quilts
(looks like I'm not the only one still playing with Christmas fabric, check out Lorna's new QAL!!)
My Quilt Infatuation
Crazy Mom Quilts
Confessions of a Fabric Addict
and with
Mrs Sew and Sow for Scraptastic Tuesday

Sunday, January 1, 2017

Cows Quilt Flimsy Finish

One of the fabrics I snagged when I was shopping with Julie last week was a rich purple, my aunt's favourite colour, "Mementos" by Gudrun Erla for Red Rooster Fabrics.  I thought with the multi-coloured daisies all over it, it might work as the border for the cows quilt.  I'm so happy to say it DID!!
Finishing this flimsy was on my 'sidenote' to my Q4 list and with a couple of hours until midnight, I got it done!  The above photo was taken first thing Sunday morning, January 1, but Instagram peeps saw it New Year's Eve.

Monday, December 19, 2016

Jethro Tull the Bull

Good and bad news with ol' Jethro... He's done, yay and I love him.  However, something happened when I printed out the pattern last summer, and he is a 1" smaller block than the cows. 😖
You may recall his main squeeze, from my previous post, is Myrrh.  Aka Myrrh Tull. 😉
He goes together very slick, despite the rather daunting amount of, and look to the sections.  This is Maartje's (Maartje Quilts in Amsterdam) Mad Bull found here.

Wednesday, December 14, 2016

Unto Us A Bossy Is Born

Well this is hilarious. Good thing I can always laugh at myself...Can't even blame Bella for this one.  Guess I inadvertently hit publish when I was just starting the title of this post!  I knew it closed the draft screen when I moved from one place to another to start this post, carrying not just the laptop but a cup of tea too (ya I know, there could've been a LOT worse accident, right) but I did not check the list of posts where I would have seen that it PUBLISHED, yikes.  So there was the shortest post ever for me and probably for any other blogger in QBL! LOL

Sunday, August 28, 2016

Sunday Stretch for Sewists #12 - Swan

Swan pose works strongly into one hip socket in one way, and fairly strongly into the other but in a different way.  Therefore be sure to do both sides. :-)

To get into the pose in the easiest way, come onto all fours.  Slide your right knee up behind your right wrist.  Start to swivel the right foot up towards the left wrist, still supporting yourself on your hands. See how the knee feels.  If there is pain here, then do not do this pose; stay tuned for September when I show you Eye of the Needle.

If your knee is okay, then start to creep your left leg back, looking back to ensure it is straight behind you, and coming to rest on the top of your foot.  If your bum is not in contact with the mat, sit that butt cheek on a block (or a couple of quilt books!) so that your hips are level.
Place your hands as shown, or rest both in front of your shin.  Try to think about bringing that shin parallel to the top edge of your mat, sending the knee to the side of your hip.  Flex that right foot gently to protect the knee joint.  Don't sit on your foot; that is pigeon pose, which doesn't have the outward rotation we are looking for in the hip joint. It is not necessary to have your shin parallel; especially in the beginning it is more difficult, so work towards that, but never forcing.  Alternatively, if the block is too high, you may use a folded up quilt under your butt cheek:
note the dog foot, Naala, photo-bombing me! Didn't have the heart to crop it out.
If your butt cheek rests comfortably on your mat and your hips are level, then stay there and breathe.
Hold for 1 minute, maybe working up to 2 over time, breathing slowly in and out through your nose.  You can place your hands further back, as you see in the above photo, which will increase the arch in your low back.  This is a bit of a back bend.

Next, on an exhale, slowly come down to Sleeping Swan.  Take your time getting to the floor...
maybe resting at first on your forearms as shown.  Notice the legs haven't moved.
Perhaps eventually resting your forehead on your stacked hands or on your forearms.  Finally maybe extending your arms in front, palms down, forehead on the floor:
or placing the palms together in prayer if you like.
Stay here for a total of 3 minutes (use that timer on your phone!) starting from the time you start to lie down, breathing in and out through your nose maybe to the count of 3 or 4, relaxing everything as your 'marinate' your hips in this pose.

To come out, inhale slowly back up, remove the prop under the butt cheek so you can lean to that side and swing your back leg around to the front. Set both foot soles on the floor and enjoy the 'spearmint' feeling of warm/cool/buzzing/tingling feeling you get when you release out of a long-held pose.  Maybe do some slow windshield wipers movements back and forth with your bent legs.  Then do the other side!

The more we can rotate our hips in their sockets, the better health our hips will have, and the less chance of needing hip replacements down the line.  Hip and knee replacements are off the charts in the West compared to the East, because we do not live on the floor.  As I tell my yoga students from time to time, spend 5 minutes a day watching the news or your favourite show, sitting cross-legged, working up to 2.5 minutes or more per side, alternating one leg in front of the other.  Your hips will thank you!

I did finish two more cow blocks.

They are so cute!  These are more of the RSC 2015, last year's colours.  I have one more to make and then a bull. Finishing this quilt is one of my Q3FAL goals.

Now that several pretty strong thunderstorms have left our area, I can get back to work on this final round of our Mini Round Robin, as well as quilting Dayna's grad quilt.  Here is the Mini Round Robin, Tish's centre:

I will let you know that I have ripped more than I have sewed...my menopausal melon is malfunctioning in the math department...clearly it isn't in the alliteration department!  If you are interested in seeing the other rounds, you can click the links below to see the other 3 ongoing minis that will each be finished...uh...within 3 days! Watch for the next post to see what I did!
Round 1 - my block
Round 2 - my work on Cindy's centre
Round 3 - my work on Julie's centre

Remember to vote in the Pets On Quilts at Lilypad Quilting which closes in a few days!  You can click here to be taken to the voting page, where you leave a comment with the pets' numbers who are your faves.  Bella is tapping my arm to tell you that she is #30, and that our post is here.  You can see all the pets if you click here.  You can even win something if you didn't enter a pet, so hippety-hop on over there!

Wednesday, November 25, 2015

A Moo-velous Retreat

Even though it was pretty tough to get home at 9:30 pm Thursday night from Florida, and get to the weekend retreat for Friday morning (I did not make it for 9 am!) I am so glad I went.  Cows were the order of the weekend.  But first, I made Brady's Olaf pillowcase with leftovers from his pj shorts, and some other scraps I pieced together to make the snow-like main part.
It will be on his bed this Christmas! Eeek.
You can see the paper piecing templates and red fabric in that picture, because this is what took me a long time:
Say hello to Mary...as in Bloody, lol
I don't know if it was different surroundings, interruptions, (all good), or just being rather tired, but this girl took longer than any of them!  A little swearing occurred, which led to the bloody part of her name.  I do love her blue batik eyes. :-)  Her blaze is fabric from smocked dresses I made Brianne and Dayna for Christmas 1989.  Cranston VIP.  I know my aunt will love that detail. Red was the colour for July.

I took a break from paper-piecing and made up two blocks that I had already cut out and started assembling. They are replicas of the one I sent to Eileen...sure hope she's okay.
No clue where these are headed...but I did think of making more in green.  Maybe I could follow the So Scrappy Rainbow challenge for 2016 with these? Hmmm.

I also made time to take Rocco for a good walk on Sunday.  I missed our walks while I was in Florida.  He missed me walking him I think too!
He is not happy in his hoodie, but otherwise he would be too cold as he has no fur to speak of on his belly and inner legs.
Yep, we got our first little snowfall Saturday, just in time for the town's Santa Claus parade and Festival of Lights.  Rocco is looking at all the sculptures that are set up in the park!  Most of the snow went by the next day, although the temperatures hovered in the low 30s.  That's not Celsius, either! Brr, especially after I had just spent 10 days in 30 CELSIUS temps! (high 80s, even 91 the first day)

I finished these two gals after the retreat:
This is Ethel.  Don't you love her muzzle fabric?  It's tufts of grass!! Bahaha.
Bright or dark green was the colour for May, so I did dark.  Her blaze is scraps from a quilted runner I made for my Auntie Joan, my mum's sister who, sadly, is no longer with us, passing away a couple of years ago, much too young, from ovarian cancer.  Note how these last two cows have an extra 1/2" along the top?  They are unfinished 12", a royal PITA, and up until the retreat, I'd just figured I'd add to 1/2" strips along two sides, and then, with a few other quilters admiring all the cows, we hit upon being able to add along the top edge, as there are only two pieces there.
Interesting in that I auto-adjusted this one, as I do all my photos. However, I didn't like how dark picmonkey made dark green Ethel in auto-adjust, so I undid it and left her as is. The light background fabric has a much better definition in the aqua cow, but it made the eyes seem more electric than they actually are, although they definitely are arresting!
Aqua or light blue was the colour for June.  Her blaze is a piece of fabric my sister Wendy brought me back from a Caribbean cruise she was on several years ago.  Hence this cow's name is Carib, not to be confused with carob, native to the Mediterranean area. ;-)  Recognize the wave fabric?  It's from Cloud 9 Fabrics, and the quilt I made of the same name. 

So that brings my herd number to 8.  Indigo, orange and lime green are the remaining colours I need to make yet.  I also need to make Maartje's Mad Bull who will be black for Black Angus cows.  At the retreat, two of the gals to whom I gave a copy of this pattern were farmers, and one told me when I said some of the cows have named themselves as I sewed them, that it is the correct thing to do, name your Holstein milk cows! Who knew.  All my aunt's cows had names, some of them not so creative, like B3, lol, or Jersey who was, you guessed it, a Jersey cow!

So now that I have three more cows done, I have to get quilting on the Bento Box, which is loaded onto the Avanté.  I also did a little stash restocking while in Florida as well as at the retreat, so more on that, as well as on some of my warm fuzzy feelings about said retreat in another post. :-)

Linking up with Freshly Pieced and Sew Fresh Quilts. It's been a while!  Remember to check out what Craftsy has in store for us with Black Friday approaching....did I hear the phrase "stash restocking" somewhere recently?!  If you click through to Craftsy on the button on the sidebar, I will get a little compensation, so I thank you. :-)


Tuesday, November 3, 2015

Things That Make Me Smile

Meet Kahlua, the latest of my cows for my aunt's quilt
Citron--avec un accent français, oui oui?!--"see-troh" à la stuffed up nose...notice the difference a little starch makes for pressing between these two...might've found a new love.
I'm shamefully far behind in the cow quilt.  Yellow was the March colour of the month at SoScrappy! Brown was the October colour.  You can see my first two cows here.  I also have a purple (April) one done. Although they are time-consuming, 2.5 hours at least per cow, I adore them.

Sunday, April 12, 2015

Two Blocks for Two Kids

Although I don't know Yvonne, I have run into her work several times over the past several months of linking up at various linky parties.  When I heard from Judy at Quilt Paradigm that she was asking for blocks for two kids whose father passed away very suddenly, I thought, well this sounds like a worthy cause.  I went to her blog, and hey! found that she does Thankful Thursdays!  I wrote my first one here, thinking I had something unique and original...well, great minds think alike is what my mum always says, and she is absolutely right.  I truly believe in the idea that all beings, animals too, are linked, connected, that we can tap into a mega stream of consciousness if we only find the right frame of mind.  Anyhow, I'm not sure when Yvonne started doing Thankful Thursdays, but I will have to link up my next post.  I don't do them weekly anymore; all right, let's be honest, last week's was the first in several months!  But talk about synchronicity (another thing my mum says a lot), it was right around the time I wrote my last Thankful Thursday post that I went to Yvonne's at Quilting Jetgirl.

Yvonne's April 2 Thankful Thursday shows some of the blocks she has received, and provides links to her original posts where she explains about the project and about Mike's death, her friend, who was the kids' dad, the pilot of the Virgin Galactic mission.  This post is worth the read about a challenge quilt she created that expresses grief, yet hope in working through the aftermath of the tragedy.

The first block I made is for the girl.  Her blocks need to be in portrait orientation, 7X10" finished, and could be ocean or dance-themed.  My first thought was, no surprise, the ocean.  I went to Google and eventually with much surfing (and digressing), found this page.  I also did a second Google search for "lighthouse quilt blocks" and combined and rearranged a couple I saw there.  Got out my newsprint paper, and drew this:


Friday, March 20, 2015

Sharing

Happy First Day of Spring! Happy International Day of Happiness!

So sharing is a rather à propos topic for this day, and for this week for those of you who read Sew Fresh Quilts on Wednesday.  Most quilters share.  They share fabric, sources for fabric, patterns, quilting tools, tips, advice, designs, photos of our projects, the list goes on.  I have benefited from this sharing so many many times. I hope I have reciprocated as much in return.

I gave you a sneak peek at a cow muzzle a few days ago.  I have two entire cows done now! These are January (blue) and February (pink) blocks for the Rainbow Scrap Challenge at SoScrappy. Yellow is March, so she will have to wait until we are back home in Kingsville to be made.


Sunday, March 15, 2015

Itty Bitty...

Knitting Bag!  Bet that wasn't the completion of the title you first thought of!  It started with a plastic bag which didn't quite cut the mustard for carrying around the fingerless gloves I've been working on.  I thought I should make a small bag for this small project, one I usually take in the car on the trips up to Sarasota for yoga twice a week.  I thought it should be scrappy.  I just happened to have a block left over from Scraps of Calm.  That is where it started.  I added a row to make a 16-patch, almost started cutting some 2.5" squares, and then I remembered!  I have a bunch already cut!
Do you see the scrap from the Seashell runner? Lower rh corner

Monday, October 20, 2014

Shades of Frostiness!

I'm actually caught up with Snowalong!

Here are my two (yep, TWO!) versions of Snowflake #3:


That is version 3 of snowflake #3.  So far I've always just done version 1, but I see a common thread between these first 3 snowflakes I've made.  Do you?


Give up?  The centres are all dark.  So these three will most likely stay in my home, either growing up to be throw pillows or a runner.  They are sooo pretty!

I then had a thought:  to try a non-conventionally-coloured snowflake.  So, I did another snowflake #3, this time version 1.

Ooh!  I'm liking it.  This is such a gorgeous, rich purple batik I used for the background.  I could just about fall into it, it's so deep, no?  I was thinking of maybe doing a pale mauve flake, but then saw the mauve and steel blue (probably there's an actual name for that colour) on white batik with the snowflake-style bursts, and thought it might just work.

So I now have four snowflakes in my collection...


and can't wait to see what Joanne has dreamed up for Snowflake #4.  Head over to Canuck Quilter's Snowalong post for today to jump in the snowbank with the rest of us!  It's more fun than the real snowbank, I promise!  No snow down the sides of your boots, or melting on your wrists under the cuffs of your mittens, or down your low back...yep, been there, done that.  Not going back.

Watercolour Steps is on the frame and should be off tonight.

Lots of ruler work on this one

I really need to quilt on my Avanté every day.  I am beyond rusty.  However, I plan to take it for Show 'n Tell tomorrow night at our guild meeting.  I am excited for the meeting as it is about the Barn Quilts Trail of Essex County here in Southern Ontario! Here is a link to the website.  And here is a link to the trail right by my house!  I've seen several of them on this trail before I had any idea that there was an actual trail!  Many are along the wineries route.  We have 18 wineries within Essex county.  What's that?  Have I visited them all?  Well, not quite all.  Think I've missed one, but it just opened this past summer, or maybe I've missed two...  What was I writing about??!  Oh, ya. Wineries.  I mean, quilt blocks.  Barns.  Wait a minute!  Wine and barn quilts...mmm, great combo I'd say for a tour!  I'm not going to be the designated driver, just sayin'...

I am linking this post up with Joanne's Snowalong and Marelize's Anything Goes Mondays as well as Lee's WIP Wednesdays (She is grumpy too, must be something in the air;  see my Oct. 22 post for more about the Watercolour Steps WIP and general crabbiness.)
http://www.freshlypieced.com/

Monday, October 13, 2014

Frozen!

Lots going on in my sewing corner.  Some I can talk about; some I can't.  There, how's that for an attention-grabber?

A few more exciting events have occurred in my life.
First off, I sold my first quilt!  If you've checked out my Quilts for Sale page, you will see it's Floral Dreams, the June pattern of Cynthia's Scrap-a-Palooza series.  It, and a makeup pouch I made, both sold at the boutique at our guild show.  Woot! Woot!

Gone to good homes I hope!


Second, I have been asked (well, I told her, if she ever needed anyone...) to pattern test another blogger's new pattern which will soon be available in her Craftsy shop.  This is another first for me, and I'm thoroughly enjoying it.  I spent all day Sunday and a little of Saturday cutting scraps to test the pattern.


Too much fun...also too much fabric I have; OMG I'm sooo bad, make that good...wink.  Good for this type of work!  Good for Cynthia's Scrap-a-Palooza, which I have not been doing (round robin was occupying front and centre for quite some time....and still should be, cough.  Where is she, you ask?)  Ahem, here:

At the trellis stage still... 24 of 100+ blocks done... what have I done??!!

While I worked yesterday, I finally watched "Frozen".  Yeah, I know, slightly behind the times here.  I really enjoyed the movie!  I didn't get much sewing done during the film though; I can't just listen to a movie; I end up stopping and watching, and thus not a lot of sewing gets done.  In keeping with the movie's theme, I started another snowflake!  I had a few hiccups and interruptions along the way, so I'm late to the linky parties, story of my life.  Mostly good interruptions on this Thanksgiving Day: phonecalls to and from family, FaceTime with my grandson, dinner at some friends'...all of whom I am so grateful for.


Here is another picture of the set-up for my oh-so-fancy business card and Add-a-quarter ruler.  I remembered how invaluable it really is!  My mind works well, albeit a tad slowly these days!  You can eliminate the pre-folding along all the sewing lines this way. 

1.  Place the paper side up, with the just-sewn and pressed new patch underneath on your cutting mat.
2.  Place the business card with one edge along the next-to-be-sewn line.  Fold back the paper, butting up the fold against the business card.
3.  Leaving the business card in place, place the ruler over all 4 layers (fabric, paper--shiny side down, business card, paper---folded so shiny side is up) until the lip catches against the layers.
4.  Trim!  Now your 1/4" is added perfectly in line with the sewing line so you can easily line up your next fabric patch.

I got so excited to finish this snowflake before we went over to our friends' house, and had hopes of finishing this post (I'd started it last night) also before we left, that I sewed my two halves together and got this:
Oooops...

Nooo!!!  As soon as I opened it up for the ooh and ahh surprise, I saw I'd forgotten to piece in the white strip between the two halves!!  Are you kidding me?  Reverse sew.  Cut the strip.  Finish up the block:

Snowflake #2 Version 1
At least I got it done so I could take an outside shot!  I really like these.  I think this particular version is easier than #1, so if you are a little intimidated, try this one before Snowflake #1.  Joanne's instructions and organization make it really straightforward.  I wish you could see the silver sparkles in the white fabric.  It looks so pretty.

I'm not sure where these blocks will end up.  I've had a few ideas, mostly in the throw pillow category (check out Joanne's tutorial here) but I can so see a pretty quilt, or maybe placemats, or a runner!

Here's Snowflake #1 from last week once again:

Linking up with Canuck Quilter's Snowalong, and with Stitch by Stitch's Anything Goes Mondays.