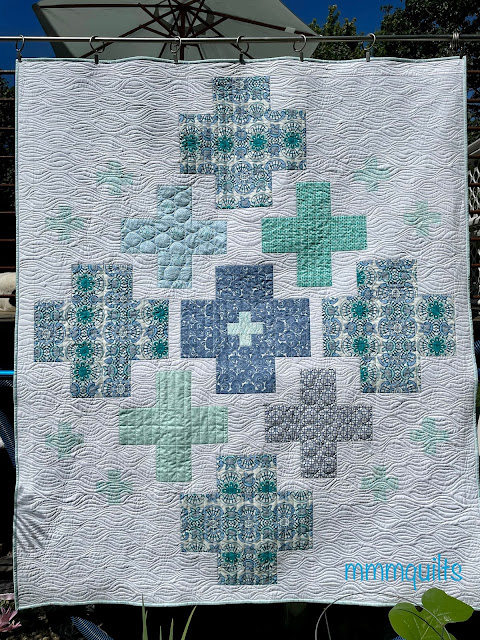
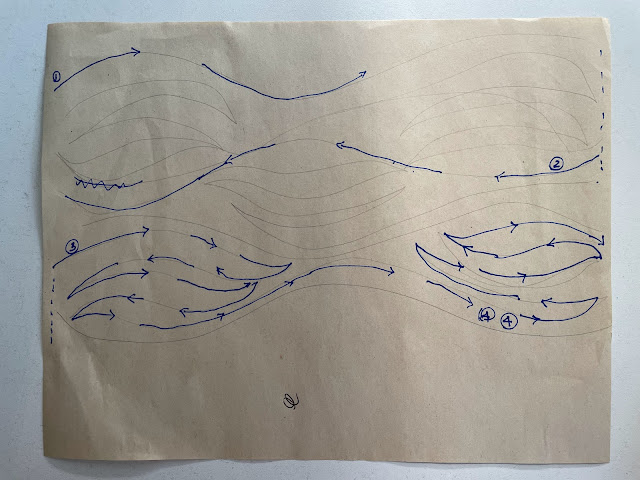
It reminds me of Lorna's Sew Fresh Quilts organic wavy line quilting. A picture is worth a thousand words so they say, so here is your picture!
I would do two passes, lines 1 and 2, across the quilt to make the outer curved lines. When I got back to the left side of the quilt, I would fill in my ovals as you see at #3, though these would be filling in the ovals between 1 and 2. I used the next set so it is spaced out for clarity. Lines 3 and 4 swoop back and forth five times and then flow between the narrow part to the opposite end of the next oval, where I would swoop back and forth five times again which got me ready to flow between the narrow part to the next ovals.
Did I mark to get the ovals the same width? Yes, with a Hera marker as I went, making a little 'tick' at the 2.5" mark for the maximum width of each oval. You can adapt any pantograph to FMQ; just doodle it to figure out a way to quilt it. I've done a fair bit of pantograph-inspired quilting.
Wouldn't you know it, but shortly after the Drift post, I was looking for a pattern for a reader, and came across an article from ten years ago in McCall's Quilting about doing this very thing, and why it really works well, especially for the early pantographs which weren't intertwined as well as the new ones these days are, and looked very blocky. I was pretty chuffed to read that!
Piecing Tip
The piecing tip is one you may know, but I learned it many years ago on one of Alex Anderson's Simply Quilts episodes from John Flynn. He's an engineer, and he fascinated me with his point of view on the mechanics of sewing and of quilting. He had the coolest design for adapting your DSM to be a quilting machine, turning it sideways, and using PVC tubes to roll the quilt back and forth under the sewing machine needle. We're talking many years ago, prior to the influx of home longarm machines, so he was quite the revolutionary.
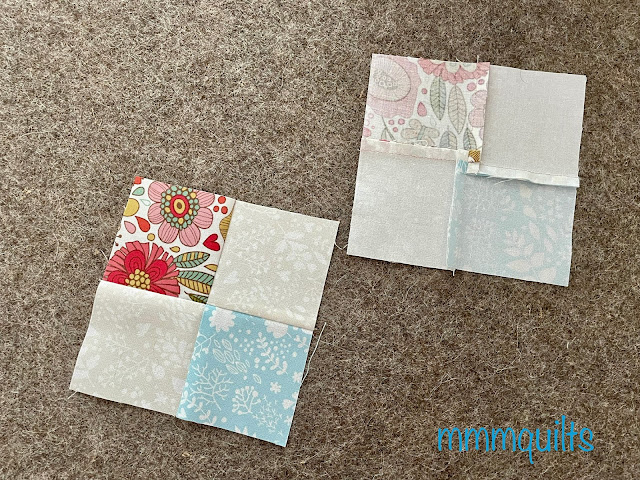
So, feed your block into the machine so that the seams are pointing towards the presser foot.
Of course this won't work with seams that are pressed open, but there's no need for pinning, just snuggle the seams of the four-patch in this case, feed them into the machine, and voilà! Nested beautifully. I like to spin the seams so that centre is nice and flat, and I think the teeny four-patch that results is adorable. Of course, pressing onto my alpaca/sheep wool pressing mat from Prairie Spirit Alpacas (no affiliation, just love these Canadian-made mats - and check out her socks!) makes these lie extra flat!
I should have a quilt reveal on Friday for you with these Bird Song fabrics by Pat Sloan (her newest line)!
I'll be linking this post up at Kathleen McMusing for her Tips & Tutorials on the 22 of September.


Before I had Bubs and just either the non stitch regulated or stitch regulated, I followed paper pantograph patterns with the laser light, which quite often left me feeling seasick, and with my original short arm, I did everything from the front by eye or marked with chalk. How times have changed. Ah, John Flynn.......I've one of his books lurking on bookshelves too. He was amazing. We used to get quilt shows on pay TV, way back when, but that is a thing of the past. Good tips you are passing on. Thanks, take care & hugs.
ReplyDeleteI admit I haven't tried wavy line quilting yet, but I like the swirls you added. I think I could make this work on my DSM. Just need to play with the design.
ReplyDeleteI have been putting the top seam toward the presser foot simply so the one underneath doesn't "flip" as it goes under the foot.
ReplyDeleteI love getting to see quilting paths; you deconstructed the pantograph so neatly. And I also love using the tip to sew nested seams with the seam pointing toward the needle; it locks them in so nicely sans pins!
ReplyDeleteYour piecing tip is especially important if you are spinning the seams. You want to sew all the blocks the same way or they won't spin in the same direction. That's probably clear as mud.
ReplyDeletePat
Both of these tips are great! Drift is so lovely.
ReplyDeleteJust trying, with the help of my engineer hubby, to set my DSM so that I can use it like a long arm. I did it with the last quilt. I turned my machine sideways but was fighting with the quilt to keep it moving smoothly. Rolling it onto PVC tubes sounds like a great idea. I had piles of books all round my machine which the quilt kept catching on! Will have to try your technique for converting pantographs. I did know the technique you describe for piecing but I somehow always manage to sew so that I can't spin my seams - just in too much of a hurry I guess :-)
ReplyDeleteHi Sandra! Wow - great tips. I love the panto idea! I don't have a longarm but always looks at pantos for easy all-over design ideas. Sometimes I think I can master them and other times, not so much. With your nifty drawing, I do think I could give it a go. Now I just need to find my mojo again but I'll PIN it for the future. I hope the visit with B was fabulous - I'm sure the time went by way too quickly. {{Hugs}} a bunch. ~smile~ Roseanne
ReplyDeleteLove the quilting! It's great! And yes, there is lots of texture there! I'm looking forward to seeing what those 4 patches are set into! :-)
ReplyDeleteGreat hints! Love the way you made the “psuedo panto” and off you quilt! I use the tip from Alex Anderson all the time for piecing. It really does work!
ReplyDeleteThank you for sharing your Drift quilting design - it is very effective and I imagine once you got into the rhythm of it, it would flow quite nicely. Yaay for nesting seams - that's a technique I love to use too.
ReplyDelete