Back in January I got a survey from Craftsy. Among the questions was one that asked if I'd be willing to review a pattern/kit. Hands (yes, both of them) flew up! Well, checked the box, okay. I actually never thought when I started this blog 2.5 years ago that I would get to do something like this. Happy dance! First and foremost, Craftsy did send me the pattern and the fabric to make the tote, and I am an affiliate, so there are affiliate links in this post. My opinions are my own. :-) The first one is I LOVE THIS BAG!!
There will be lots of little tips throughout this post. Lots of photos too, and I'm not apologizing for it. It's such a neat design, and of course, how can one go wrong with Kaffe Fassett fabric? Not possible, I know.
When you order the kit for this new item, you get the pattern sent to you as a PDF. I like this feature which is the case with most patterns these days. I do not print them out. I download them onto my MacBook Pro.
Tip #1: Then I email myself a copy of the PDF, so I can open the email, and enclosed PDF on my iPad or my iPhone and have it beside my sewing machine. I kill no trees.
I have made a TON of bags in my quilty and pre-quilty life. So I consider myself an expert. ;-) Just so you know.
This pattern is pretty easy, but maybe not for the first-time bag maker, unless you do go for it, and bookmark this post, wink, because I can save you some frustration.
 |
| Strips laid out in a pleasing ararngement |
Tip #2: When you sew the strips together to make a strata, try to line them up so one edge is pretty even. Not all fabric is created equally at 43" wide.
Tip #3: Alternate the sewing direction. Don't always start sewing from the same end. This prevents "bowing" where the strata will end up in a bit of a curved shape rather than square. Fabric is a bit stretchy remember.
Tip #4: Note the placement of fabrics within the strata; the ones you love should be towards the centre of the strip set. This is because you cut a portion of each bag body on the 45 diagonal. I didn't realize this when I made my strip set; I was concerned with alternating the oranges with the pinks and the florals with the geometrics. The orange polka dot is not my favourite fabric, so I wouldn't have had it front and centre had I realized this. This is one of the places where I feel a diagram would be helpful to show you where this strip set is headed.
I tried out my new iron! My new mini iron! Eeep! Thanks
Jayne for sparking my interest in this little gem! I did find that it works better with smaller items than the strata here, but man, does it work! I have the Clover mini iron (mine is the original; that link takes you to the II, new and improved, ha) that looks like a curling iron which I adore for paper-piecing. Mine, at the age of 16+ years, is still going pretty strong (needs the tip attaching a bit better--hello, MacGyver? are you reading this carefully? Add this job to your list please and thank you). However, the down side to my old mini iron is that there is no steam with that little baby. This one has STEAM. And some weight. If you wonder why there are two HSTs that measure less than 2" in that photo, it's because I used the iron on them just to see...WHOA Nelly! The best! Those are more for my Scrap Vortex, which seems sucked into the vortex of piecing twos stage, LOL. This iron will definitely be with me on my next retreat, which is in May.
 |
| Side by side so you see how small it is. But don't be fooled; this little gem packs a serious punch, no lie. |
Back to the bag: I sewed 5 of the 10 strips together, and then the other 5, and then joined the two. I found this easier to sew as well as to press. I pressed my seams to one side, which, you will see, is probably the best for this pattern's quilting. There is no indication in the pattern as to pressing.
 |
| One bag body side complete Tip #5: Cut the fusible fleece (or regular batting, which is what I used with a little Quilt Basting Spray) a little larger than the pattern specifies. You can see how tight mine ended up; I allowed a little extra on the sides, but not on the top and bottom |
The pattern says to quilt in the ditch of each seam. Period. Move on. That's
not how I roll and you know it! I did quilt in the ditch, which is why I suggest pressing the seams of the strata to one side.
Tip #6: quilt in alternating directions here too, which will help keep the piece nice and square.
 |
| Quilting complete: straight lines down the centre of each strip as well as in the ditch |
On one side I did a straight line down the centre of each strip with the Sulky Holoshimmer metallic thread; on the other side I did a wavy line. I chose to FMQ outline those gorgeous leaves in the side panel print with a Coats and Clark variegated thread, and I did two straight lines with a row of beads between them in the purple polka dot strip with a YLI purple variegated. As you know by now, pretty much every single project of mine has feathers of some kind in it, and I did some in one of the strips on each side of the tote. In the photo above you see pink feathers stitched in Sulky rayon.
 |
| a closer look |
These I always thought were
Kathleen's cheater feathers but in Angela Walters' Free-Motion Quilting With Feathers class, she shows how to do them there, so I think Kathleen may have got them from Angela...remember what I said in my
Swoon Mini post about imitation being the most sincere compliment. :-)
 |
| And here are the feathers in orange rayon on the opposite side where I have the wavy lines in pink Holoshimmer |
Tip #7: When it came to making the straps for the bag, I added in some batting. Why does Sandra save long skinny strips of batting when she squares up a finished quilted top? You got it:
It was easy to trim the batting strips to about 1.25" and place them inside the folded straps. This gives a bit of a cushion to that strap on your poor shoulder! I top-stitched them 1/8" from the folded edge, as per the pattern, but I also did the same along the folded edge, and then stitched a straight line down the centre of each strap. Looks nice. Helps hold that batting in place.
 |
| Two bag bodies done with straps attached |
When you attach the straps to the bag body, you want to position the strap carefully. Centre it over the black/purple strip; this helps create the illusion of one wrap-around strap and one not. The pattern just indicates how far from each side to place the straps.
Tip # 8: This may be one of the most important of my tips. There is no indication other than "sew the vine panel to the left of the strip set" when it comes to sewing the 3 sections of the bag body together. You can't tell from the picture on the front of the pattern whether each side is like this, or whether each side is a mirror image, which is what I decided to do. This ensures that the vertical panels will be beside each other at the side seam. I preferred this look. You may prefer the angled side meeting the vine panel at the side seams. Totally up to you. Again, a diagram might have helped here.
The vine print has large zinnia-like flowers randomly over it; it is a crapshoot as to where the flower falls on your bag; one of my vine panels had a flower near the top, the other had none. I'm glad I got one, so I wanted it to be near the top of the bag, nice and visible. I quilted it out in Holoshimmer of course!
 |
| Total serendipity that the vines matched there... |
Here's a shot of the back so you can see how I quilted the bag bodies.
 |
| I could not, could NOT crop that adorable little pittie puppy bum out of this photo! Cuteness overload. |
Note to self: that vine motif makes for a pretty cool all-over FMQ design, no? And those of you who are eagle-eyed like my sister, Linda, will have spied a certain crafty-looking box of goodies in the upper left...not crafty...Craftsy goodies! That's for another post... create suspense, keep 'em coming back! ;-)
One other note is that the tab they refer to for closing is actually a loop! I pressed it, thought nope, that can't be right, must be pressed the other way, thinking I was making a buttonhole in it, and then I realized, oh! It's a skinny loop that goes around the button! Cool. I like this better than making a buttonhole.
I did find a couple errors in the pattern instructions and have let Craftsy know about it: instruction #17 says to "turn bag right side out." NO! Don't do that! Leave it wrong side out before you sew across the bottom to "box" the bottom. There could be a nice diagram there too I think for the sewists who have never made a boxed bottom bag. The other error in the boxing the bottom of the bag is that they omit doing this for the lining. Oops, unless you want a bunched-up lining in the bottom corners of your bag, you should box those corners as for the main body.
 |
| There's a nice-sized pocket inside and I just LOVE the fabric for the lining! |
Tip #9: in order to help your lining stay inside your bag, I like to match the sideseams as best I can together and then sew in the ditch of the side seam right side up, for about 3-4" on each side.
 |
| You don't see a thing on the right side, well if you scrutinize you'll see a few stitches on the left in the seam |
The other side of the bag, and an attempt to get a little sun on the shimmery thread:
On the inside of the bag:
 |
| not as invisible, but it's the inside of the bag |
Tip #10: I do this sometimes at the bottom of the bag as well. Line up the bottom seams of the outside body and the lining as best you can. Drop a couple pins in to hold the layers in place. Make a kind of bowl and slide it under your sewing machine foot. Stitch in the ditch for about 3-4".
I also like to cover a piece of 1/2" foam (the kind they use for under sleeping bags when you're camping in a tent) with fabric from the bag and place it in the bottom of the bag to add stability. My foam is back in Kingsville, so it will have to wait.
Threads. I went to town:
I pieced the bag with Mettler polyester. I found out last Fall thanks to the patient and knowledgeable owner of Joy's Quilts in Windsor, Ontario, that
Mettler is Mettler in every country in the world except for America, where it is known as Isacord. Huh? Okay.... Anyhow I like it, it's great quality German thread, and I didn't worry as I usually do, about piecing cottons with a polyester; after all, I'm quilting on them with polyesters and synthetics! Here's the back side of the bag:
 |
| Vibrant colours in the Florida sunshine! |
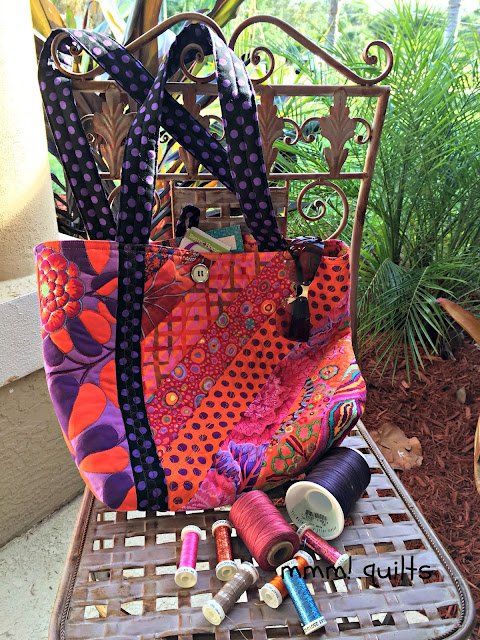
Just so you get an idea of the size of the bag, I, ahem, made an attempt at a selfie...
 |
| Selfie with bag...or is it Bag with selfie? LOLOL |
Pretty cool! I can't wait to use it....guess I'll be using it tomorrow when we go to a Show 'n Shine car show in Englewood!
Today, besides finishing up this bag and writing this rather lengthy post, was a special day for another reason: Naala, our beloved Rottweiler mama bear dog, turned 9. NINE!! Cannot. Be. Possible. She's aging so well. :-) Here's to the next nine, sweetheart!
Quilt Stats:
Pattern: Rowan Three-Quarter Patch Tote from Craftsy
Size: approximately 17" wide by 12" high by 5" bottom width
Fabric: Kaffe Fassett for Rowan Fabrics
Batting: Pellon Nature's Touch 100% cotton
Quilted: on my Bernina
Threads: pieced with Mettler; quilted with Coats and Clark variegated in reds 40 wt, Sulky Holoshimmer, Sulky rayon and YLI variegated in purples 40 wt
Linking up with
Crazy Mom Quilts, with TGIFF at
Quokka Quilts and with
Confessions of a Fabric Addict. Head on over for a tons of
squirrels, er inspiration and creativity!
Update: for ES's request in the comments: This is the only photo I can find of the camper's foam I cover for the bag bottom insert but it's already covered! For more photos that bag post is
here.
Here is a link to what I think may be the same product on Amazon, a
3/8" thick closed cell foam pad but I got mine at Canadian Tire. When I am back home in Ontario, I will search this out; great stuff and fully washable.


 I also like to cover a piece of 1/2" foam (the kind they use for under sleeping bags when you're camping in a tent) with fabric from the bag and place it in the bottom of the bag to add stability. My foam is back in Kingsville, so it will have to wait.
 I pieced the bag with Mettler polyester. I found out last Fall thanks to the patient and knowledgeable owner of Joy's Quilts in Windsor, Ontario, that Mettler is Mettler in every country in the world except for America, where it is known as Isacord. Huh? Okay.... Anyhow I like it, it's great quality German thread, and I didn't worry as I usually do, about piecing cottons with a polyester; after all, I'm quilting on them with polyesters and synthetics! Here's the back side of the bag:

 Update: for ES's request in the comments: This is the only photo I can find of the camper's foam I cover for the bag bottom insert but it's already covered! For more photos that bag post is here.


Pretty please, can you show a photo of the foam you will use in the bottom of the bag? I'm intrigued!! Sounds like a great idea!! The bag turned out really nice :)
ReplyDeleteFirst, I love Kaffe and those colors are just gorgeous! I know my limitations on bag making so I never 'go there'! Great tips and thanks for sharing them. I love seeing how things come together and lots of pictures...never apologize for that! As for that little iron, isn't it great? I took mine on my retreat and it was so handy to have right at my side the entire time!
ReplyDeleteI sent you comments in your email but I forgot to say Happy Birthday to Naala!!
ReplyDeleteLove the colors in that bag! It's a really nice size, too.
ReplyDeleteHappy Birthday, Naala!
My not-so-furry niece, happy birthday! <3 Oh Rocco <3 just way too cute, silly photo bomber!!
ReplyDeleteLOVE the bag, those colours are delicious!!
Good for you for pattern testing!
Happy birthday Naala! I love the bag and the fabrics are beautiful! Great tips for anybody making a bag.
ReplyDeleteWow, following your tips and pics is like taking a class! I'm very inspired and may give it a go when I'm back in the mountains!
ReplyDeleteWhat a beautiful bag. I would have added the extra quilting as well. It makes the bag stronger, right? I'm so glad you shared so many details. I learned a lot from all your tricks and tips. Thanks!
ReplyDeleteHAPPY BIRTHDAY Naala!
ReplyDeleteWhat a great bag...with great prints. Happy Birthday, Naala.
ReplyDeleteAfter reading all your tips and tricks, I don't think I need the pattern :-D
ReplyDeleteThank you for including the puppy bum - makes a darling picture :-)
Hugs,
Preeti.
http://sewpreetiquilts.blogspot.com
This comment has been removed by the author.
ReplyDeleteThank you so very much for blogging this. I'm a newbie at quilting... well, a newbie at sewing really! And when I ordered my bag I didn't realise how few instructions there would be with it. I didn't have a clue where to start. Having read your review I am so much more confident tackling this project. Fingers crossed it all turns out as beautiful as yours. Best wishes Shaz x
ReplyDeleteI am gettong ready to make the bag, and I really appreciate your tips. What a great help!!!
ReplyDeleteWell thank you! I doubt you'll come back,(well maybe you will now you're making the bag!) but thank you for writing this to me; makes the time spent writing and taking photos and editing etc worth it. Hope you email me a photo of your bag when it's done. ephdra at gmail dot com :-)
ReplyDelete